240: Business Infrastructure Masterclass | How to Create an Electronic (Digital) Records Management System for Small Businesses in High Demand
Subscribe

We’re continuing our encore of the masterclass edition of the Business Infrastructure podcast. In the last episode, you heard the story of Sarah and Steve Reuben – siblings whose rivalry and siloed leadership enabled a virus attack on their family-owned business’s network. A consultant taught them how to design an Electronic Records Management system to organize, store, and secure their digital files while also protecting their operations from future digital disasters.
Electronic Records Management is the third element in building business infrastructure. It involves organizing all your digital files based on the departments you identified in the Business Parts Analysis. It also includes assigning proper access rights according to the roles identified in your Business Design Blueprint. It’s the perfect complement to disaster recovery and business continuity planning.
Now you can discover how to create one for your organization! In this episode, host Alicia Butler Pierre offers a 9-step tutorial on creating an Electronic Records Management system. You’ll not only end up with an organized, disaster-proof system, but you’ll also have peace of mind knowing that your digital assets are accounted for and protected. With remote back-office operations and small business cybersecurity attacks on the rise, you don’t want to miss this lesson!
Monologue: Alicia Butler Pierre, Founder & CEO – Equilibria, Inc.
Location: Atlanta, GA USA
Air Date: February 5, 2023
Resources
Books:
- Behind the Facade: How to Structure Company Operations for Sustainable Success: a book by Alicia Butler Pierre.
Websites:
- Disaster Recovery and Business Continuity Plan Template: download a free template to create your company’s plan to protect operations from prolonged disruptions or shutdowns.
- Request a free 15-Minute Discovery Call to learn how you can create an Electronic Records Management system for your small business in high demand.
- Get free monthly business infrastructure tips when you sign up for our Smooth Operator newsletter.
Software to Create an Electronic Records Management Matrix:
Software for Storing Digital Files:
Articles:
- 3 Tools to Build Your Business Immunity to Failure During Covid-19: an article by Alicia Butler Pierre.
- How to Organize Electronic Records: an article by Alicia Butler Pierre.
- Small Business Owners Increasingly Turn to Digital Documents to Ease Persistent Workplace Disruptions: an article by PandaDoc.
Presentations:
Related Episodes
Credits
- Writer, Producer & Host: Alicia Butler Pierre
- Podcast Editor: Olanrewaju Adeyemo
- Transcription: Jodie Maquiran
- Sponsors: Equilibria, Inc.
Bios
More About Host, Alicia Butler Pierre:
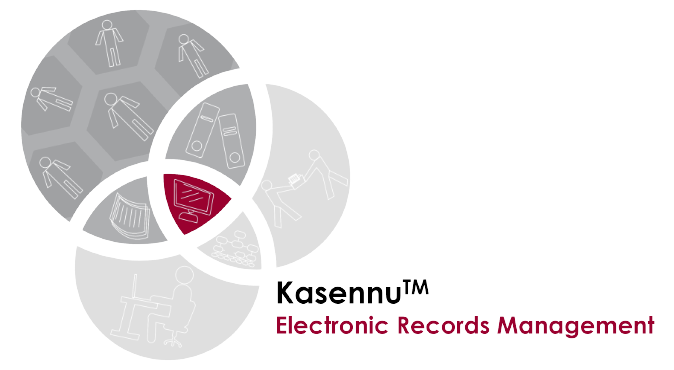
Alicia Butler Pierre is the Founder & CEO of Equilibria, Inc. Her career in operations began over 20 years ago while working as an engineer in various chemical plants and oil refineries. She invented the Kasennu™ framework for business infrastructure and authored, Behind the Façade: How to Structure Company Operations for Sustainable Success. It is the world’s first published book on business infrastructure for small businesses. Alicia hosts the weekly Business Infrastructure podcast with a global audience across 68 countries.
![]()
![]()
![]()
![]()
More About Sponsor, Equilibria, Inc.:
Equilibria, Inc. is an operations management firm specializing in business infrastructure for fast-growing organizations. Our mission is to provide access to tips, resources, and proven frameworks that revolutionize the way small businesses operate. We do that through original podcast episodes, blog posts, videos, presentations, workshops, and coaching sessions.
![]()
![]()
![]()
![]()
Transcript
This episode originally aired on February 6, 2022.
In the last episode you heard the story of Sarah and Steve Reubens, a brother and sister who don’t get along, but eventually come together to ward off an electronic virus attack on their family owned business. They work with the consultant, Gary, who introduces them to the Kasennu Framework for creating business infrastructure. Specifically, he helps them create an electronic records management system that includes access rights, a data backup plan and cybersecurity protocol.
They even develop a disaster recovery and business continuity plan to minimize the impact of future digital catastrophes. I’m Alicia Butler Pierre, and I’m about to teach you the same techniques Gary used to help the Reubens. By the end of this episode, you’ll know how to create an electronic records management system that’s not only compliant, but also protects your company’s digital assets. Get ready for your next lesson.
This is Season 19, Episode 240: How to Create an Electronic Records Management System.
Let’s start the show!
Welcome to Business Infrastructure. The podcast about curing back-office blues of fast-growing businesses. If you’re a business owner or operator looking for practical tips and solutions to scaling your business in a sustainable manner, you’re in the right place. Now here’s your hostess, Alicia Butler Pierre.
“It’s stunning to me to see the digital transformation that is across our industries. Every part of our society, every part of our economy is so radically changing.”
That was from Satya Nadella, the CEO of Microsoft. It’s a clip from a Microsoft 2017 keynote presentation that he gave fast-forward to 2020.
And he was quoted as saying, we’ve seen two years of digital transformation in two months. That was in reference to the rapid digitization of work in response to the onset of the COVID pandemic. And now that more organizations are embracing fully remote or hybrid work solutions, the need to have a structured way for managing digital information is more important than ever.
A paperless office comes with many perks. It frees up physical space, removes geographic work restrictions, and it makes information accessible from anywhere, but there’s a catch. Without careful organization, digital files can get lost, become difficult to navigate, and they can be hacked. That defeats the purpose of having a paperless office in the first place. And it’s further complicated when you don’t have backup systems and cybersecurity in place.
That’s why an Electronic Records Management System is so important.
So what exactly is an Electronic Records Management System? Before we get into this definition, there’s something you should know throughout this lesson. You’re going to hear me use the terms electronic and digital interchangeably.
Now back to the definition, an Electronic Records Management System links the processes, digital technologies, and the people needed to consolidate, organize, backup archive, and protect electronic information in a format that’s easy to follow and very structured.
It represents the third element of the Kasennu framework for business infrastructure. Now, as a reminder, business infrastructure is a system for linking people, processes and tools into a cohesive framework that allows you to scale your company sustainably and profitably. There’s nine main steps that I’ll describe for creating an electronic records management system.
Now as with our previous lessons, keep in mind that the information you’re about to hear will be a high level summary. I’ll primarily describe an analog technique simply because it’s easier to describe it doing this in an audio format. But obviously, if we’re talking about an electronic records management system, all of the steps you’re about to hear me describe, can obviously be done electronically.
Step one is prepare. And here are the things that you’ll need to prepare for your electronic records management system.
Number one, remember those index cards that you had from your business parts analysis, exercise, the ones where you identify the departments. You can either reuse those same index cards, or you can write the department names onto a new set of index cards. You’ll also need new blank index cards. And I’ll explain why later also some rubber bands stickers, which I’ll also explain later, at least four different color markers or pins, a computer laptop, or a tablet so that you can record all of this information electronically.
And you’ll also need access to some type of spreadsheet software. So, whether that’s Microsoft Excel, Google sheets, or some other spreadsheet software that you prefer to use, you’ll also need as with the other exercises that you’ve heard up to this point in the masterclass, a large table, or some type of just very large flat surface that you can work on.
And then lastly, the people that you want to participate in this exercise, these could be the very same people that you used in your business parts analysis exercise, or you might just decide that you want people who represent management or leadership over some of the different departments of your company to participate. So the bottom line is as with the other exercises, you just want to make sure that you keep the lines of communication open so that people who’ve participated in previous exercises understand that there’s more to do in building your overall business infrastructure.
Step Two: take an inventory of all digital information. Now here’s where you’re going to use that new set of blank index cards. I want you to write the name of each type of file onto a separate index card using the same color ink. So if you have four different color markers or pins, you might decide for example, that anything that represents the type of electronic or digital file will be written in black, for example, just to make sure that you’re consistent across all of the file types, that you’ll be documenting onto these different index cards.

Don’t be overly specific in this case. Remember, you want to write the type of file. So instead of writing something like March bank statement 2022 or April bank statement 2022, you’d instead write bank statements into one index card. Now the types of electronic or digital records are vast, and it can include things like software, database files, pictures, scanned information like scanned receipts or scanned contracts that you’ve signed. Videos, eBooks, SIM cards, memory cards, and even podcasts downloads and other audio files. Once you’ve identified the type of file on each index card, I then want you to write the file type source in parentheses underneath the name of the index card.
Step Three: categorize file types by department. Remember the business parts analysis exercise that we went through earlier in this masterclass. Now you’ve heard me say this before is foundational to all of the other elements for creating your business infrastructure. During that exercise, you identified your company’s departments.
Now, if you don’t remember it, or if you haven’t listened to it yet, please make sure you go back and you listen to episodes 182 and 183. You’re going to take the index cards that have each of your companies department names. And you’re going to spread them across that large flat table or large flat surface horizontally. I then want you and your team members who are also participating in this exercise with you to take all of those index cards that have the names of those digital file types.
And you’re also going to spread those across that large flat surface, but here’s specifically what you’re going to do. You’re going to place the index cards containing the name of each type of digital file underneath the index card, representing the department that that file type is most closely associated with. So, very similar to your business parts analysis exercise, you’re going to end up with several different columns of information spread across this large table, for example, organized by department.
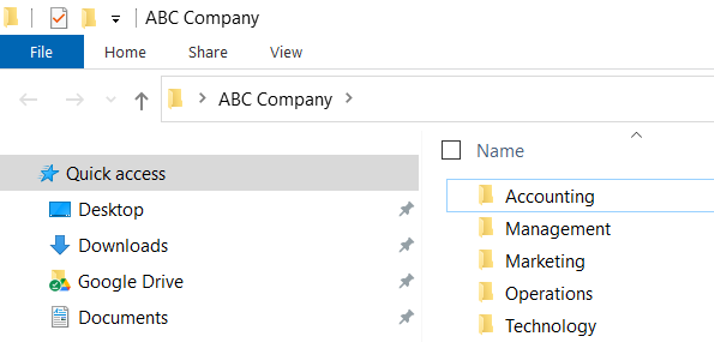
So for example, if you previously identified that your company has an accounting or a finance department, then you might determine, you and your team, that the bank statement file type is most closely associated with that accounting or finance department.
Step Four: determine file access private versus public. And this is going to be so key in helping you kind of establish a baseline for cybersecurity efforts. Now, in determining which digital files you want to have public versus private, you’re going to write that information onto each index card.
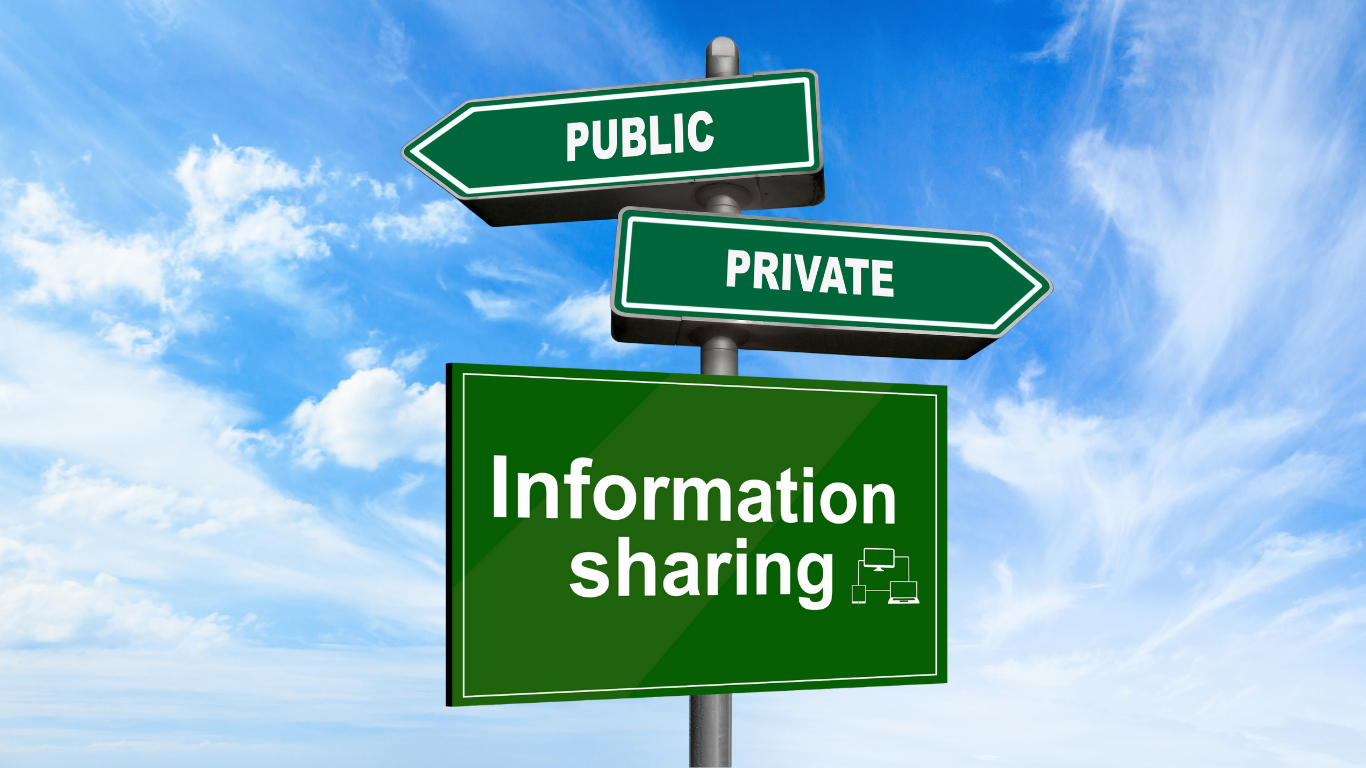
So at this point, again, you have all of these cards spread out on this large table. Everyone who’s participating in the exercise can see them, and you want to take a different color ink this time and write down the word public or private on each index card, representing each type of digital file.
Now in the story that you heard with Sarah and Steve Ruebens, remember they worked with a consultant named Gary. And Gary actually gave them stickers that they could use to put onto each index card. One sticker was a closed padlock, and that represented any digital file that needed to remain private. And the other sticker was an open padlock and that represented any information that was public.
And in case you’re wondering, public documents for the sake of their exercise, were those documents that could be viewed and opened by anyone in your company, not by anyone out there in the world, specific to your company. So when we say the word public for purposes of the exercises we’re describing in this particular lesson, just know that we don’t mean public, you know, again it’s open up to the entire world, but public meaning anybody that works for your company has access to that particular type of document. Private documents are those that only certain people should have access to. So things like your accounting records, for example, your human resources, personnel records, things that have people’s confidential or sensitive information such as tax identification numbers, and social security numbers, basically information that, again, should be private and not accessible by everyone in the company, but only a few people.
There’s also instances where you might need a hybrid approach where certain people, maybe they can have access to the file, meaning they can actually see it. They have view only access, but they can’t edit that particular document. They can’t make changes to it. So you can also make a judgment call as to how you’d like to best represent that approach as well. Now here’s where your business design blueprint can come in handy.
And if you haven’t heard of that, or if you aren’t familiar with what it is, then I’m going to refer you to episodes 184 and 185, so that you can learn more information about what a business design blueprint is. But the reason I’m bringing that up right now at this point in creating your electronic records management system is because you want to reference that hierarchy of resources that you created in your business design blueprint, and use that as guidance for selecting the best level of security or access to certain data.
Here’s what I mean as you and your team are looking at every single type of file that you see spread across this large table in front of you. And you’re trying to determine who should have access. Full access rights versus maybe limited view only access rights, refer to your business design blueprint, and based on where, you know, certain people fall in that overall reporting structure. That’s another way of helping you figure out who should have private access versus who should have public access. So that’s just a, another tip instead of trying to rack your brain and kind of brainstorm all over again. Why not just take what you’ve already created and just use it as a reference point for coming up with the right type of access level for each type of role when it comes to every single type of file in your company.
So just a quick recap, before we get into the final steps. At this point in the exercise, you’ve taken an inventory of all of your digital information. You’ve categorized that information by department and you’ve determined private or public access for each person that’s on your team.
The next step, Step five is, determine optimal storage. You want to make sure that you determine the best type of storage for each file type, and then write that onto your index card in a different color.
Now, again, going back to the story of Sarah and Steve Ruebens, their consultant, Gary actually had stickers that represented a cloud, a network or some other type of electronic storage solution. But if you don’t have stickers, that’s okay, because again, you can simply write that information directly onto each index card that you have representing the different file types. And of course, you’ll use a different color other than the black that you use to identify the file type itself. And the other color that you use to represent whether that particular file type should be private or public.
Now keep in mind when you keep data locally on a computer’s hard drive without some type of remote data backup, that’s extremely risky, but unlike the Ruebens and their furniture store, many small businesses just don’t have the luxury of creating an in-house network. It’s not an inexpensive solution. I don’t want to sugarcoat it or make it seem like that’s the norm because it’s not, not by any stretch of the imagination, especially when we talk about most of you who are listening right now that may even still consider yourselves as freelancers or just people who work in the overall gig economy, independent contractors.
So, that’s why cloud solutions like Dropbox, Google drive Evernote. These are other options for you to consider because at least your information can be stored in the cloud at a fraction of the cost of what it would take to operate a custom built network for your company. And there’s also other low cost Wiki-based tools like ClickUp and Notion. And for those of you who are subscribers, and you’ve been listening to this show for a while, then you know that my team and I here at Equilibria, we love using Notion, but we also use Dropbox and Google drive as well.
Step six: select the best data security option. Again, using a different color ink other than what you’ve used so far to identify the optimal storage, the private versus public access, as well as what type of file it is. You now want to take that last different color ink that you’ve been holding on to and write the best data security option for each type of file. Remote data backup services are likely going to be your safest bet to securing your data, but caution should also be exercised.
If you, right now, you might be backing up a lot of your data to an external hard drive. Maybe even if you’re still old school, you might still also be using CDs and DVDs, but I want you to keep something in mind, all three of those options, the external hard drive, CDs and even DVDs. All three of those are susceptible to mechanical failure, theft damage due to fire or flood. So I would just caution you. I know a lot of times when you’re traveling, it’s just easier to maybe have that really small, external hard drive that can hold up to a terabyte or more of data. I use the same thing. I use it, especially when I’m traveling, but I would just caution you against using that as your primary means of backing up data, truly consider some type of remote data backup service.

Now, once you’ve selected the best security option for every single file type that you see before you on that table, you’ll need to figure out the frequency at which you want to back that data up. So when you start to approach these companies that offer remote data backup services, they will ask you what frequency do you want this data to be backed up? Do you want it every couple of hours, every four hours, once a day, once a week, start thinking about that information now, because I guarantee you, any remote data backup service provider worth, you know, that company’s worth their salt. They will ask you for that type of information.
Step Seven: rearrange your digital files. So now that you’ve gone through the point of figuring out how to best categorize or organize each of these file types that have been inventoried and you’ve categorized it by department.
Now you need to, this is where you’ll kind of gather up all of that information from your table. You’ll secure each department and its associated file types. You’ll secure those with rubber bands. And now you’re going to go about the work of actually rearranging information, wherever you may be currently storing documentation or where you want to start storing that electronic information. So you’re just going to remove those electronic files, rearrange them, whatever it is you have to do to mimic what you just, you and your team, just laid out across that large table.
More than likely of course you’ll have to create sub folders. So you’re going to have the main folders that correspond to each department, but within each of those main folders, you’ll likely have sub folders as well. Make sure you delete duplicate files to save space. I see this a lot of times, whenever I’m working with clients, they get really excited and they start moving things around and then they forget they might have duplicate files in other places. So they might have some things here on Dropbox. They might have the same thing in Google Drive, for example, and then they may also have it on an external hard drive. Figure out the one place you want to have it, where that remote data backup will take place and make that be the primary location. Once you’ve moved everything around you’ve rearranged and you’ve you’ve, you have all of these digital files exactly where you want them.
Now it’s time to start setting up the proper security levels. So again, pull out those index cards for each file type and make sure that if there’s certain information that everyone should have access to, then you go ahead and grant that access. And for those file types that were identified as private, where only certain people should have access to that information, go ahead and set up that type of access as well. And it’s also a good time to rename certain picture files that you may have as well as scanned documents from those original generic names. You know how sometimes whenever you’re taking a digital photograph or a digital picture, or even if you’re scanning, let’s say a receipt or some type of a contract, whatever it is, you’re scanning. It oftentimes once you downloaded, it gives this really generic name. I know a lot of times when I am downloading pictures from my phone, for example, it’ll have a very generic title, something to the effect of IMG_0981. Well, if you’re trying to do a search for that particular image, of course you’ll never find it. So it is a laborious effort, but I do want to encourage you to start getting into the habit, getting you and your team, I should say, into the habit and practice of immediately renaming files that have those very generic names, because when people come behind you and they’re trying to quickly find that information, you want to make sure that they can do that. And when it has a generic name, they simply can’t find it, or it will take them a lot longer to find it.
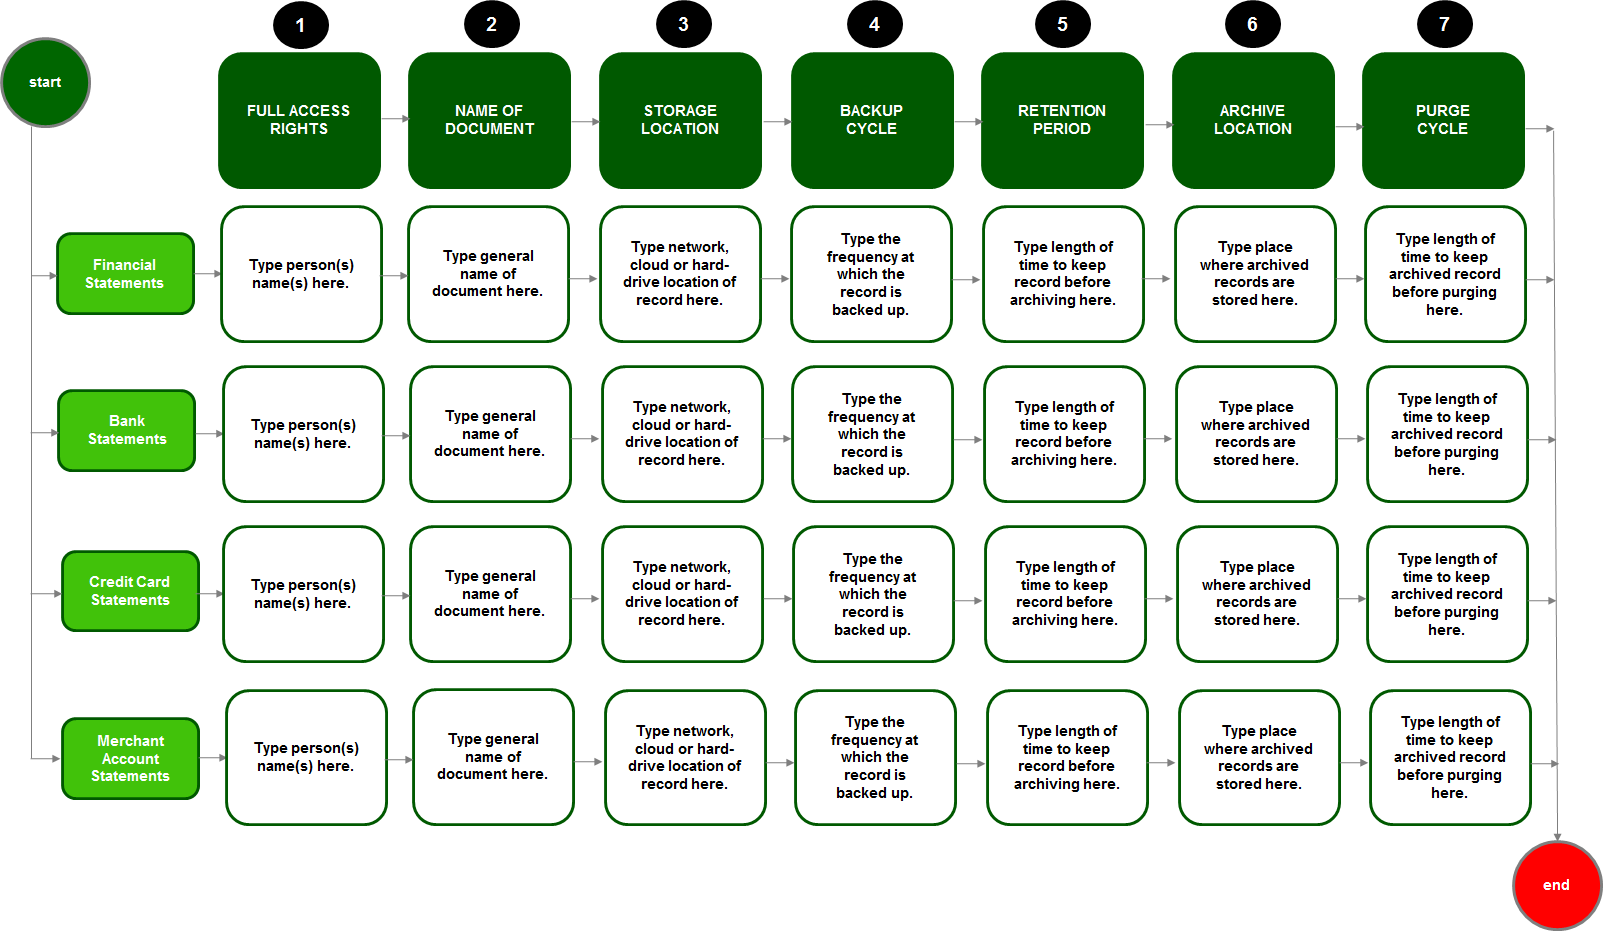
Step Eight: transfer all of this information into a matrix format. And here’s what I mean by that. You’re going to create a table in a spreadsheet program, again, like Microsoft Excel, Google sheets, and you’re going to capture the naming convention and a lot of other attribute type data for each of the file types that you’ve identified.
So, here’s what’s going to happen. This is what I usually create for the clients that I’m working with. Imagine you have this spreadsheet and you have the ability to open or have different tabs within that worksheet. You’re going to have a tab that corresponds to each department. I’m going to use accounting again as an example. So we might have an accounting tab and on that accounting tab, that associated spreadsheet, the very top row of this matrix, you’re going to have a separate column for naming, storing, retaining, purging, archiving, and backing up a file. So it’s going to go across the very first row of your matrix, but it’s also going to eventually service columns that will be filled out for each file type, which brings me to the very first column to the far left of your matrix. We’ll actually have the name of each file type. So what you’ll do is you’ll pull out a stack of index cards that you’ve rubber banded together for your accounting department. And you’ll just take a look at every single index card that represents a different electronic file type, you’ll type that out into the very first column. And then you’re going to start populating the information for the other columns. Again, what’s the best way to name a bank statement? What’s the best way to name a receipt that you’ve scanned? What’s the best way to store it? How long will you retain that, that information? How will you purge it? Will you shred it the original once it’s been scanned? For example, how long will you keep that information? How long will it be backed up? You’re going to populate this matrix for every single file type across every single department or category of electronic files. So it is going to be an extremely complete and comprehensive guide for every type of digital file in your company.
Now I’ve included a picture of what this matrix looks like, and if you click on the resources link, wherever you’re listening to this podcast right now, you’ll see it in that link. When you click that link, you will be able to see that picture of what the matrix looks like. And at this point, it’s also a good idea to go ahead and create a master list of all of your software licenses, as well as account usernames and passwords, and make sure you store that in a safe, secure, separate location from your, your main archival or place where you are storing all of these electronic records.
Example of an Electronic Records Management Matrix:
Lastly, Step Number Nine: share and maintain the system. Again, you’re not creating this. You’re not going through all of this hard work and effort to just set it and forget it. This is a living, breathing document and exercise that you’re probably going to go through at least annually to make sure that it’s reflecting the latest information for your company. So make sure you’re sharing this with people that work for you, people on your team, let them know the expectations for adhering to the maintenance of your company’s digital information.
Again, your ability to be able to quickly service your customers and your clients in a consistent way, oftentimes relies on your ability to be able to quickly access the information you need to be able to service your customers and your clients. Evaluate whether or not you’ll eventually need an official document management solution. Again, this is very similar to having a customized network. This is also a more expensive option since the solution can be customized to your company’s specific needs, but it’s very possible that as you continue growing and scaling your company, that eventually you will outgrow some of these, these tools that we’ve talked about, especially the cloud-based solutions like Dropbox or Google drive, or maybe even a tool like Notion. You might need something that’s even more robust and specifically tailored to your company’s needs.
And lastly, I just want to say leverage your electronic records management system, this matrix that you’ve created and the rearrangement of all of your electronic files to create a disaster recovery and business continuity plan. Now, I have a free template for you that you can use to create such a plan for your company. And you can download that by clicking the resources link, and this episode’s show notes.
The amount of time it takes to create your electronic records management system largely depends on your and your team’s availability to do the exercises I just described. As well as the number of files that require analysis. But one thing I can tell you for sure is that once you’ve created it, don’t put it on the proverbial shelf to collect dust, use it.
Here’s the thing: your company’s resident knowledge and intellectual property is often the ultimate difference that makes the difference and gives your company its competitive advantage. Having quick access to that knowledge in the form of electronic or digital data increases response rates to customers, as well as managers and colleagues.
Now, although there’s a trap that lies in storing information digitally with careful planning and documentation, an electronic records management system is worth its weight in gold. By documenting your company’s policies and procedures for creating, naming, storing, purging, archiving, and even backing up electronic records, you can reduce the amount of time it takes to locate those types of documents.
You can also protect and safeguard all of your digital data. An electronic records management also gives you the tools that you’ll need to develop a platform for cyber security protection, disaster recovery, and business continuity planning. It also ensures that you minimize downtime with electronic data storage and security measures.

And finally, it creates a foundation for mobile virtual remote information sharing. By the time you’re done with all of these exercises, here’s what you can expect wherever you are storing your company’s digital documents to look like the main screen of your company’s network, Wiki tool, external hard drive and or cloud documents solution has folders that align with your company’s departments. So if you have nine departments that you’ve identified for your company, when you first open up, let’s say your company’s network, you technically should only see nine main file folders. And each of those corresponds to the names of each of your company’s departments. This enables members of your team to quickly access information inside of those main folders, based on the access levels that you’ve assigned to them.
This completes your third lesson in creating Business Infrastructure. At this point, you should have a clear, consistent way for identifying the work to perform and who will perform it, categorizing that work into departments, establishing a reporting structure based on those departments and roles and organizing digital records. So that information required to perform the work is easy to access.

Did you find this lesson helpful? If so, please leave a five-star rating and a review. If you want more details about creating an electronic or digital records management system for your organization, then click the resources link in this episode’s description. It’ll lead you to our website, businessinfrastructure.TV. That’s where you can learn more about my book that this masterclass is based on.
It’s called, Behind the Façade: How to Structure Your Company Operations for Sustainable Success. And I wrote it specifically for you, the owner, manager, or consultant of a fast growing small business, but that’s not all. When you click the resources link in this episode’s description, you’ll also discover more about our services and how to join our mailing list for tips and special offers. There’s also articles and case studies that you may find helpful in creating your own electronic records management system. You can even see what the matrix looks like.
Coming up in the next episode, you’ll meet another pair of siblings, but unlike Sarah and Steve Ruebens, they actually get along. A failed audit threatens to shut down their entire operation. All because of their poor paper records management system, they only have 90 days to get a system in place that will pass their next audit. Will they pull it off? And if they do, how?
Stay tuned to find out. Until then, keep operating smoothly.
Thank you for listening to Business Infrastructure, the podcast about curing back-office blues with Alicia Butler Pierre. If you like what you’ve heard, do us a favor and subscribe, leave a rating and review. And more importantly, share with your colleagues and team members who could benefit from the information. Join us next week for another episode of Business Infrastructure with Alicia Butler Pierre.
Latest Episodes